

Whenever we start a project, one of the first things we need to determine is how the room will be used, how many people will be using it at a time, and what are the possible needs we should consider when selecting and arranging the pieces for the room. And with the multipurpose spaces like the “great rooms” that are breeding in new construction and rehabs like rabbits, many rooms need to have the flexibility to serve a lot of functions. After all, if a room doesn’t function comfortably and well, what good is it? We WANT you to love your room and that means it needs to work perfectly as well as look good doing it!
Read More
Should I hire an interior designer?
Should I hire an interior designer?
The short answer is YES. If you want to ...
Save time
A designer should have the experience and know-how to diagnose what is bugging you about your house and come up with several possible solutions tailored exactly to your situation. OR you can spend your precious free time scouring websites and magazine articles looking for someone with your exact design dilemma who found a viable solution you like and then assessing all the options for implementing it and trying to figure out which is the best real value. The choice is yours, of course.
Read More
Four Key Ingredients for Outdoor Living Spaces
As the spring weather slowly warms up and freezing rain and snow appear to be left behind for the next few months, it is time to turn our attention to the upcoming season of road construction outdoor living. Designing spaces to live outside and revel in the warmer weather is even more important here in the northeast where we celebrate that we survived another winter and the gray, pre-spring months!
On my “must have” list for anyplace I live, is a slice of outdoor space. Whether you have a pocket sized balcony, a patio, a covered or screened porch, or a deck, make the most of it so you can enjoy the beauty of nature for a few months.
Arranging an outdoor space uses the same principals as arranging an indoor space – scale, color, and balance all apply. Here are a few key ingredients to keep in mind:
Read More
Trade Secrets: Five Tips for Choosing the Perfect Rug
A well chosen area rug can pull together a whole room. While there are many ways to approach decorating a room, starting with an area rug you love is one of the most logical. The rug you choose can set the design direction for the whole room and choices are available for every possible situation, from a trendy flokati to a classic oriental, and everything in between. That said, here are some guidelines to help you with your choices wherever the rug selection falls in your process.
Read More
Trade Secrets: Sofa Shopping Simplified
Sofa shopping can be intimidating. Choosing style details can be overwhelming, but comparing quality can be even more so since upholstery has a whole set of its own vocabulary, and the quality levels vary from store to store and even within a store or brand. Largely, price is an indication of quality level, but not entirely...there is some murky territory in the middle where many popular brands mix a few quality elements in with cheaper materials or construction so they may sound higher quality than they really are. Upholstered furniture can be found at pretty much any price point, so how do you determine how much to spend?
The answer to that question depends on a number of factors…
Read More
Getting ready for the spring market? – Staging Tips from a Pro
Part of what sells a home is it’s feeling of hominess. Stripping a home of its character and emptying the rooms does not create the emotional appeal needed to sell a home. Careful editing and thoughtful arrangement does.
Here are a few key steps toward marketing your home in its best possible light:
Read More
How to create a gallery wall
Transformations: Creating a Gallery Wall
Gallery walls are among our favorite projects. While, when poorly executed, they can be chaotic, when done well they can help make a house into a uniquely personal, welcoming home.
We recently were approached by a man for help in doing a gallery wall as a surprise anniversary gift for his wife ... what a WONDERFUL and creative idea! We were delighted to be a part of it. It was a long distance project and time sensitive so we agreed to provide photo selection, frame specifications, gallery layout design, and step by step hanging instructions for him to execute himself.
The first step was for him to send us pictures and measurements for the walls we might use, and the furniture we would be working around. Below is one of the pictures of the room we began work from.
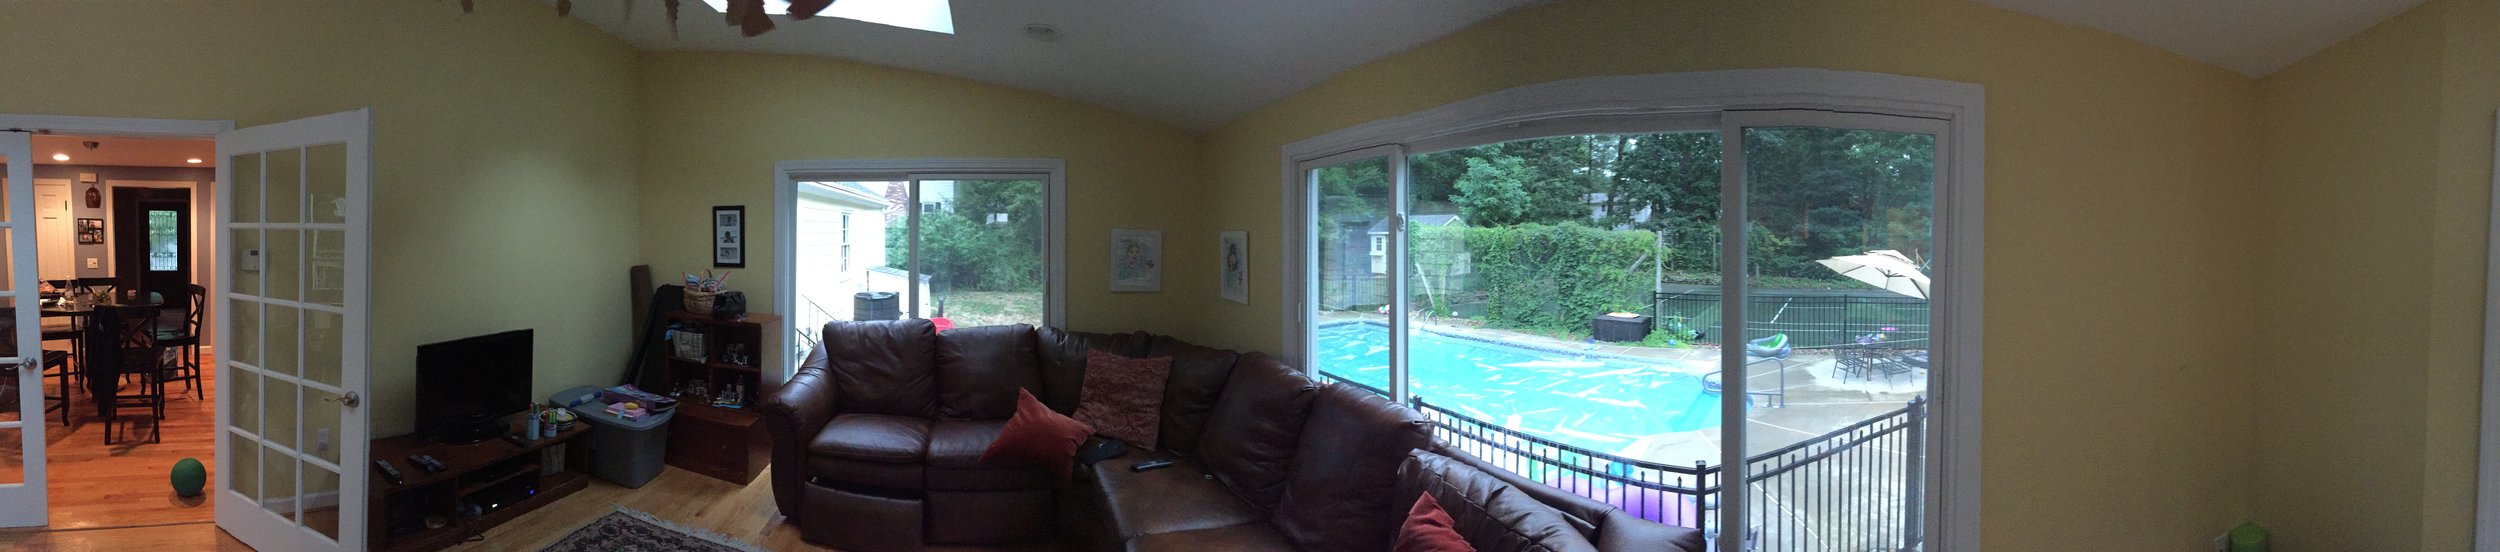
family room before
He also sent us a digital file of possible photo choices for the gallery ... we selected an assortment that represented the family well and arranged them for optimal viewing - some we cropped for better composition or photo-edited to remove old camera date stamps before they were printed.
Once the arrangement and sizing was set, we selected frames that complimented each other and the images. Having differing frame styles and mat styles is important to keep the look of the finished wall interesting, but they still need to have common elements that make them work together ... in this case, color.
We generated a complete package for him to use including: a numbered list of prints with the sizes to order and the updated digital files; a list of frames, mats, and sizes with ordering specifications for where to buy them; a detailed computer generated image of the wall showing placement for specific images and frame styles; as well as measured instructions and tips for hanging.

gallery-overview

gallery wall print specs

gallery wall frame specs

gallery wall specs

gallery wall specs

gallery wall specs
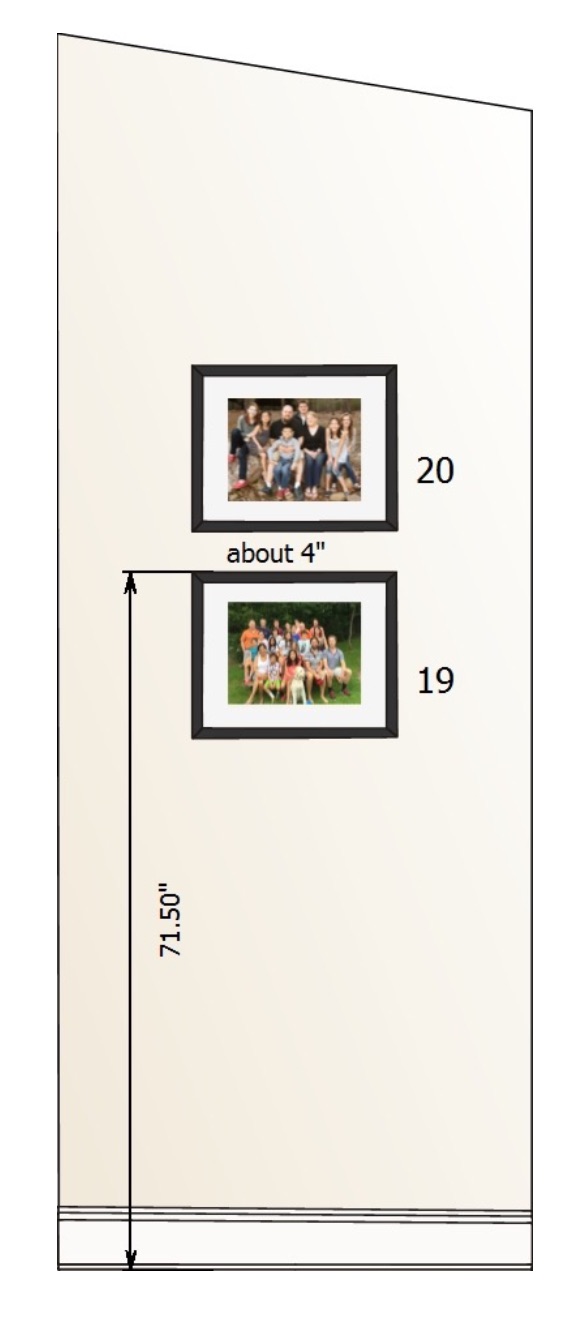
As a last minute addition, he realized he needed an additional group shot of the other side of the family, so we subbed in a new photo of the children and moved the two family group shots around the corner to extend the gallery onto the next wall. Serendipitously, he pointed out that this made it 20 photos for their 20th anniversary!
gallery wall specs
Miraculously, even in a household with 4 children, he managed to pull off the surprise and his wife was overjoyed with such a thoughtful and unique gift. He wrote to thank us profusely and tell us all the anecdotes of nearly being discovered, missteps in printing and assembly, and feverishly hanging right down to the wire - reading like a script right out of reality TV! Below are some pictures he sent us of the finished installation ...
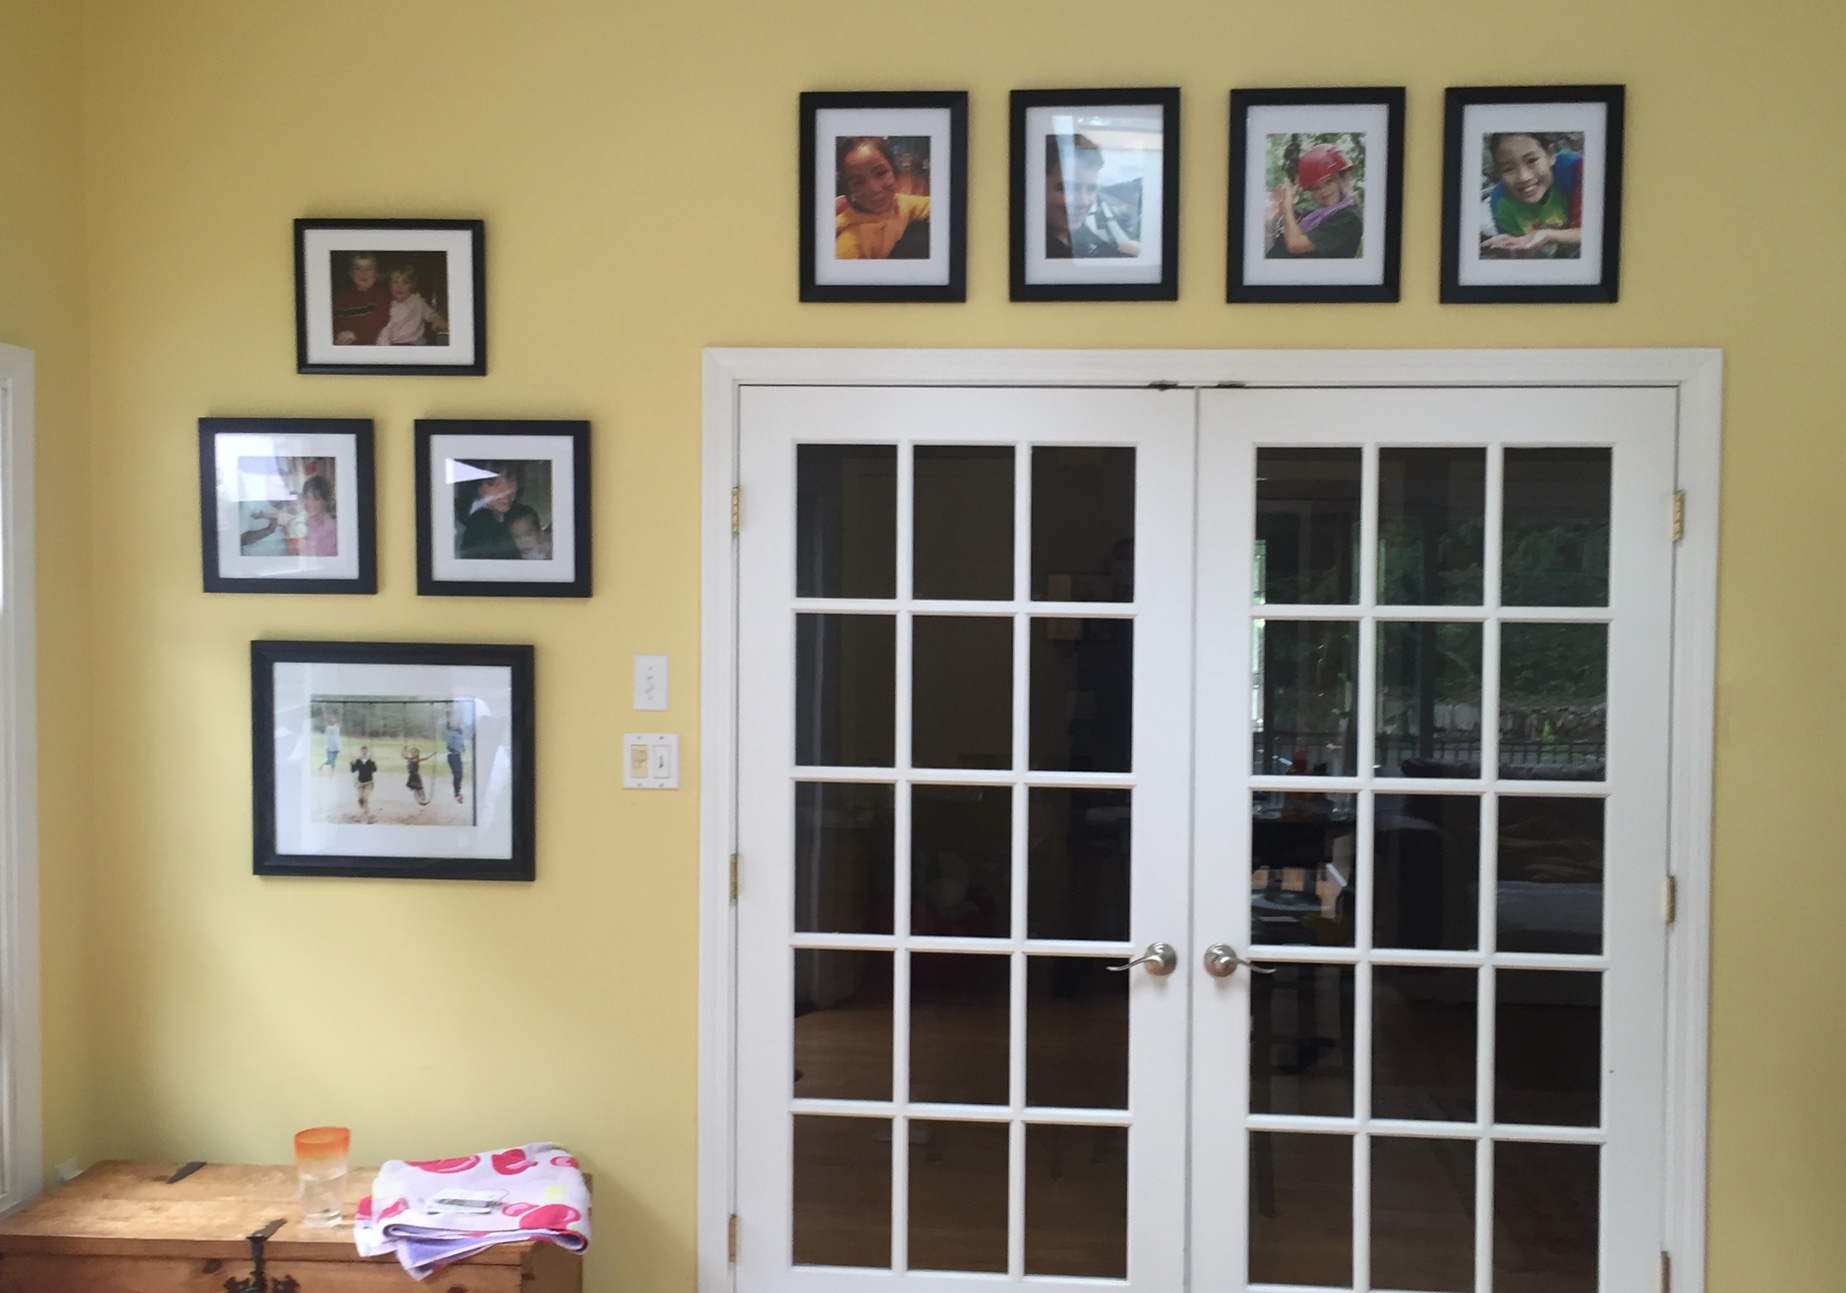
gallery wall around door

gallery wall around tv and door

gallery wall around the corner
Well Done!
and Happy Anniversary!
Here are a few pointers to keep in mind when planning a gallery wall:
- Select pictures with good lighting (they will be viewed from a distance) and good composition.
- For pictures that will be hung high on a wall (like over a door or window frame) or printed in a smaller size, choose images that are close-ups. Save the group shots for closer to eye level and for larger size prints.
- Size frames for the scale of the wall - for most gallery walls, the smallest frame should be no less than 8" x 10" for it to not look too cluttered with tiny pictures.
- Vary the sizes and orientations of the pictures for interest.
- Mats give photos some breathing room so we recommend using them - exception: canvas gallery wraps can be a nice addition mixed into a gallery wall.
- Custom framing is always beautiful and perfectly suited for the images - we use this most often for antique family pics because it also preserves them with acid free mats and conservation glass. Ready made frames are a cost effective way to do a wall with contemporary prints and give you the flexibility to change the images if the mood strikes.
- Choose a variety of carefully curated frame styles when planning your gallery wall composition and repeat them in different areas of the wall.
- Plan the arrangement on paper and/or on the floor before you start...it is much easier to rearrange BEFORE you start putting holes in the wall.
- Add picture wire or sawtooth hardware to the back of ready made frames to make hanging easier - those little triangle hooks are a nightmare!
- Begin hanging near the center of the gallery and work out.
- Level each picture and use a bit of poster putty on the back corner to hold it in place as you hang it - this keeps it in place so you can hang the next picture in proper relation to it.
A gallery wall is a great addition to any home!

Trade Secrets. tips for a Well Dressed Window
Trade Secrets: Tips for a Well Dressed Window
For the love of window treatments
Windows can be dressed in a variety of ways and what you choose and how you install it will impact the look of your room.
Here are a few tips as you make your choices:
The simplest and most versatile way to dress a window is with drapery panels. However, nothing is worse than too short panels – they are the drapery equivalent of flood water pants. My personal general preference is a ½” to 1” break on the floor, but at least touching the floor is a must. For ball gown elegance, allow fabric to puddle 8”” to 18” on the floor.
Hanging your window treatment above the window will instantly create the illusion of more height in your room. For ceilings in the builder standard 7’-8” range of years past, hanging valances right at the ceiling can do a world of good for the perceived proportions of the room.
If you are using a window treatment like a pair of panels that covers the sides of your window frame, upsizing to a rod 12” to 16” wider than your window measurement will expose more of the glass to let in more light while creating the illusion of a more generous sized window.
Use clip on rings or sewn on rings, or drapery pins to attach rings to panels and a coordinating decorative rod rather than gathering the panels directly on the rod, which can end up looking either frilly, if it creates a ruffled header, or sloppy if the pocket is much larger than the rod.
Some rods are not meant to be seen. A functional traverse rod that doesn’t show when the panels are closed, leaves the utilitarian and decidedly not decorative rod exposed like visible underwear when the panels are open … either cover it with a valance or cornice, or use a decorative traverse rod that has the working mechanism on the back side and a decorative front face.
Working fabric blinds, as well as many styles of tailored valances, should always be mounted on a fabric-covered board. Valances will hang correctly and blinds will function properly when secured to a solid surface rather than sliding around on a rod.
For a professional looking installation, curtain panels and valances should have extra fabric that returns to the wall on the outside edges on the window treatment so there is not a gap between the curtain and the wall when viewed from the side.
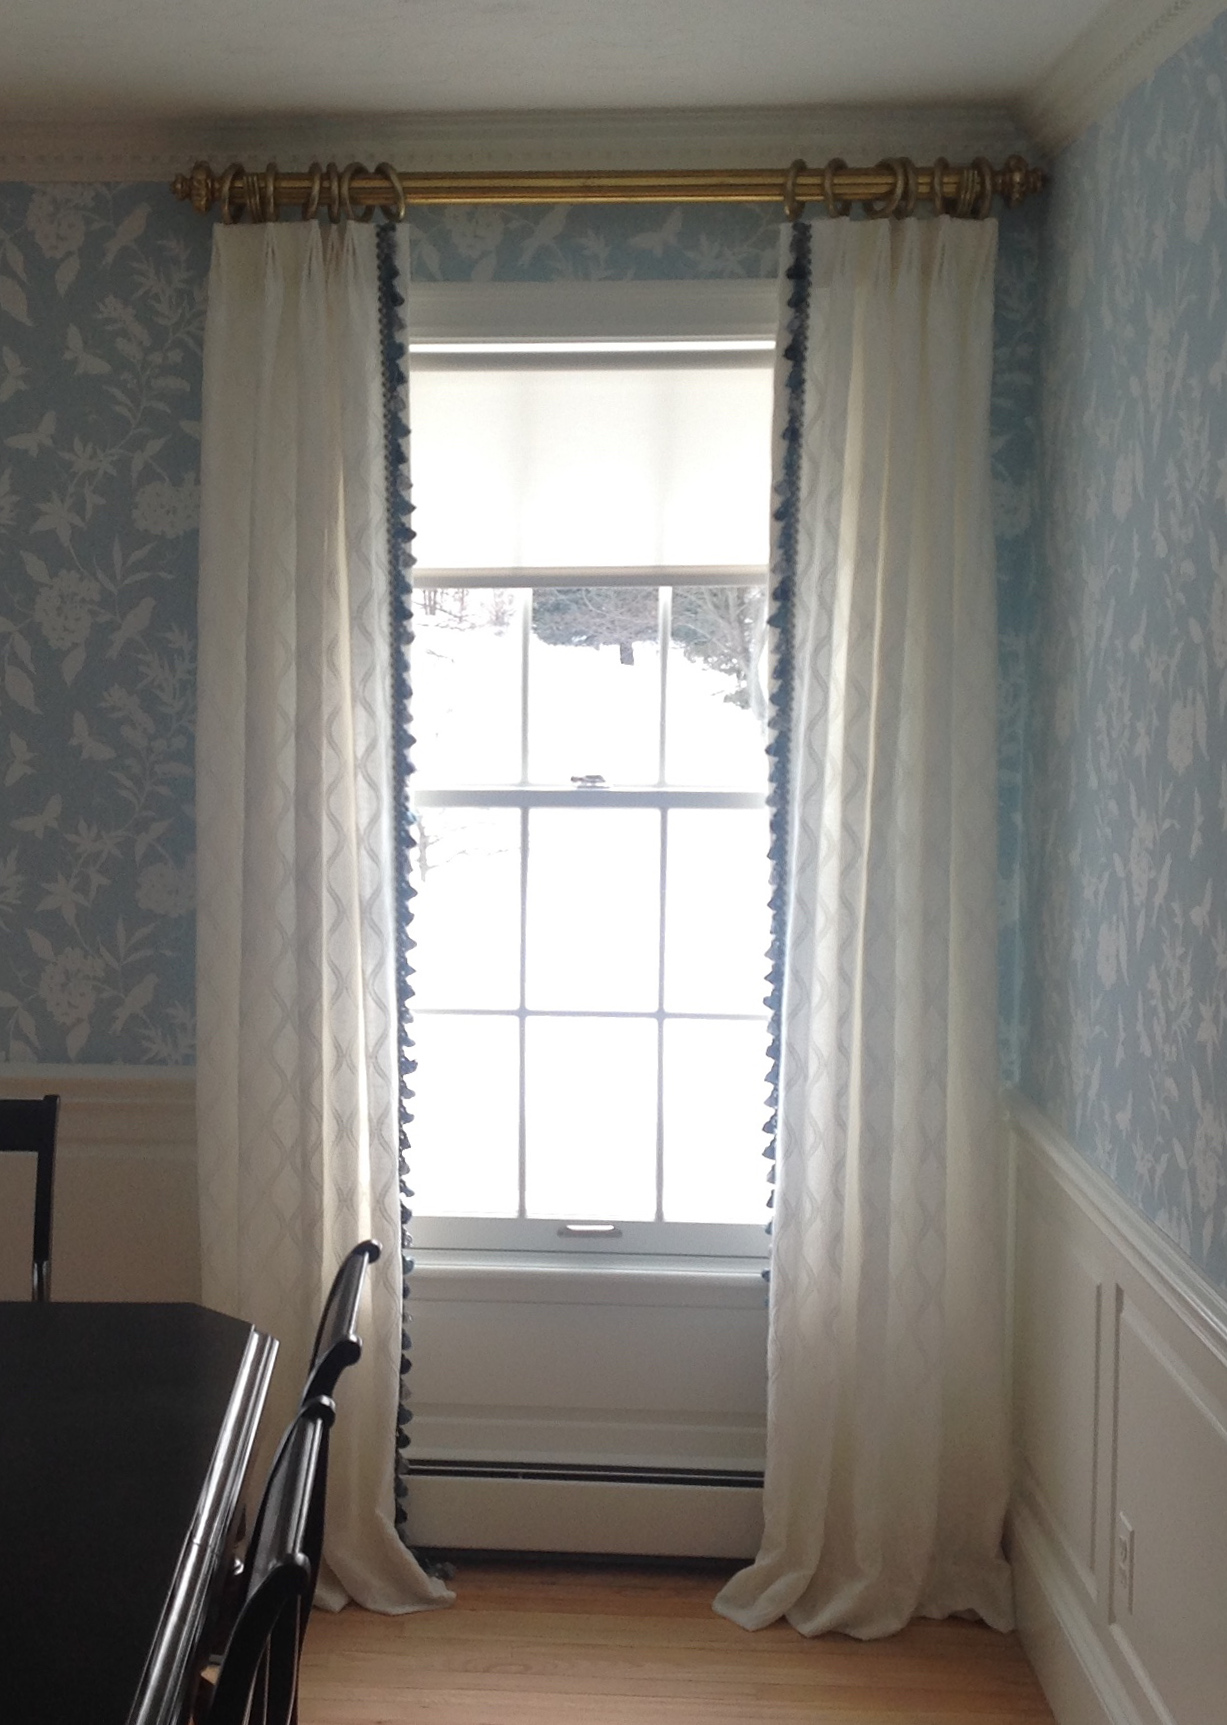
custom window panels with trim and decorative rod
I love custom window treatments. I am a self-confessed curtain snob … I don’t think most ready-made curtains are worth the money … sizes can be off by a substantial amount from panel to panel, panel widths tend to be skimpy, dye lots can be tricky, stitching is often poor quality, the lining is generally cheap if it exists at all, and interlining, which makes a HUGE difference is non-existent. That said, inexpensive panels and decorative rods from a discount store are a great option to use for staging a home for sale if windows are not already treated, or if the current treatments are heavy and/or dated. In a real estate staging application they are only used to create an impression as buyers pass through the rooms of a house.
Custom window treatments, on the other hand, are designed to do exactly what you need them to do for a particular window. Couture for your windows for a whole lot less than couture clothing and something your windows will wear every single day!
They can be sized to exactly the right length and depth to work with under-treatments (like blinds, shades or shutters), and to take into account architectural details like millwork, or uneven floors.
They can be made of any material or combination of materials and in a custom designed style so that they compliment and enhance both the window and the other details in the room.
They can be designed, and sometimes layered, to provide privacy, light control, softness, pattern or texture, and color.
They can be enhanced with dressmaker details, trims, and standout hardware that elevate the design of the whole room. Adding these details is like adding accessories to an outfit – they take it from ordinary to beautiful and unique!
Custom hard treatments – blinds, shutters, shades – from a reputable company, will be sized just for your window (there is no “standard” sized window) and give you many, many years of service.
Custom draperies are often not only lined but interlined with a flannel layer sandwiched between the face fabric and lining providing softer folds, and a sumptuous, elegant drape, and protecting the face fabric from the ravages of sun exposure. Interlining can make an ordinary or inexpensive face fabric look luxurious.
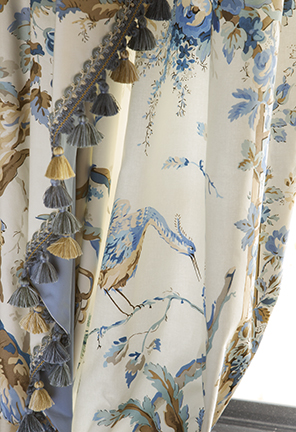
Brunschwig toile with tassel trim and contrast lining

soft Roman shade with covered button details

contrast lined valance with medallion hardware
Asymetrical swags and jabots rod mounted
Questions about custom window treatments?
We would love to hear from you!
You might also like THIS post on Window Treatment Do’s and Don’ts

tips for choosing stone counters
Trade Secrets: Four Tips for Choosing Stone Counters
Selecting stone countertops
There is nothing as beautiful as natural stone countertops – and there are almost as many options as there are kitchen renovations! Kitchen counters are one of the most important and perplexing decisions to make ... you must factor in look, feel, color and function ... and it is a decision you will likely live with for a long time.
Some things to keep in mind when selecting stone:
1. Choose a good fabricator
Most fabricators can get stone from a variety of sources for you – choose someone knowledgable who delivers good service and cares about what YOU want, not just what they need to sell.
2. Look at the actual slab(s) you are going to buy
Looking at samples in a showroom is a good start and is essential to narrow down the types of colors and ‘movement’ (how swirly, streaky, or speckled the stone is) that appeals to you. However, do not EVER plunk down your hard-earned money without seeing the actual piece of stone your counter will be made from. Stone is a product of nature and as such, the colors that are most pronounced and patterns inherent in the stone are dependent on the environment in which it was created and where in the quarry it was harvested. Every piece is unique so unless the sample came from the ground right beside the slab you are buying, it may look quite different. Uniqueness is part of the beauty of stone. If you want perfectly uniform pattern and color, either choose a more solid color stone or stop looking at stone altogether and choose a manmade product instead.
3. Consider your lifestyle and personality
Different varieties of stone have different properties and different maintenance requirements … the “patina” that a Carrera marble inevitably develops with use might be a highly desirable attribute for one personality type and a maintenance nightmare for another. There is something for just about everyone from limestone to quartzite depending on the look you want and the way you want to live with it.
4. Have someone oversee the templating
Once your stone is selected and purchased, the fabricator will come to the installation site and create templates of exactly the shape the stone will be cut. Back at the shop they arrange these templates on the slabs like a giant Tetris puzzle. If you have particular sections of the stone you wish to highlight or mitigate, be sure someone you trust is there when they decide what sections will be cut from what parts of the slab. You can buy a slab that has one place you really don’t care for in the midst of stone you love and template in such a way that the undesirable section gets removed for the sink cutout, for example.
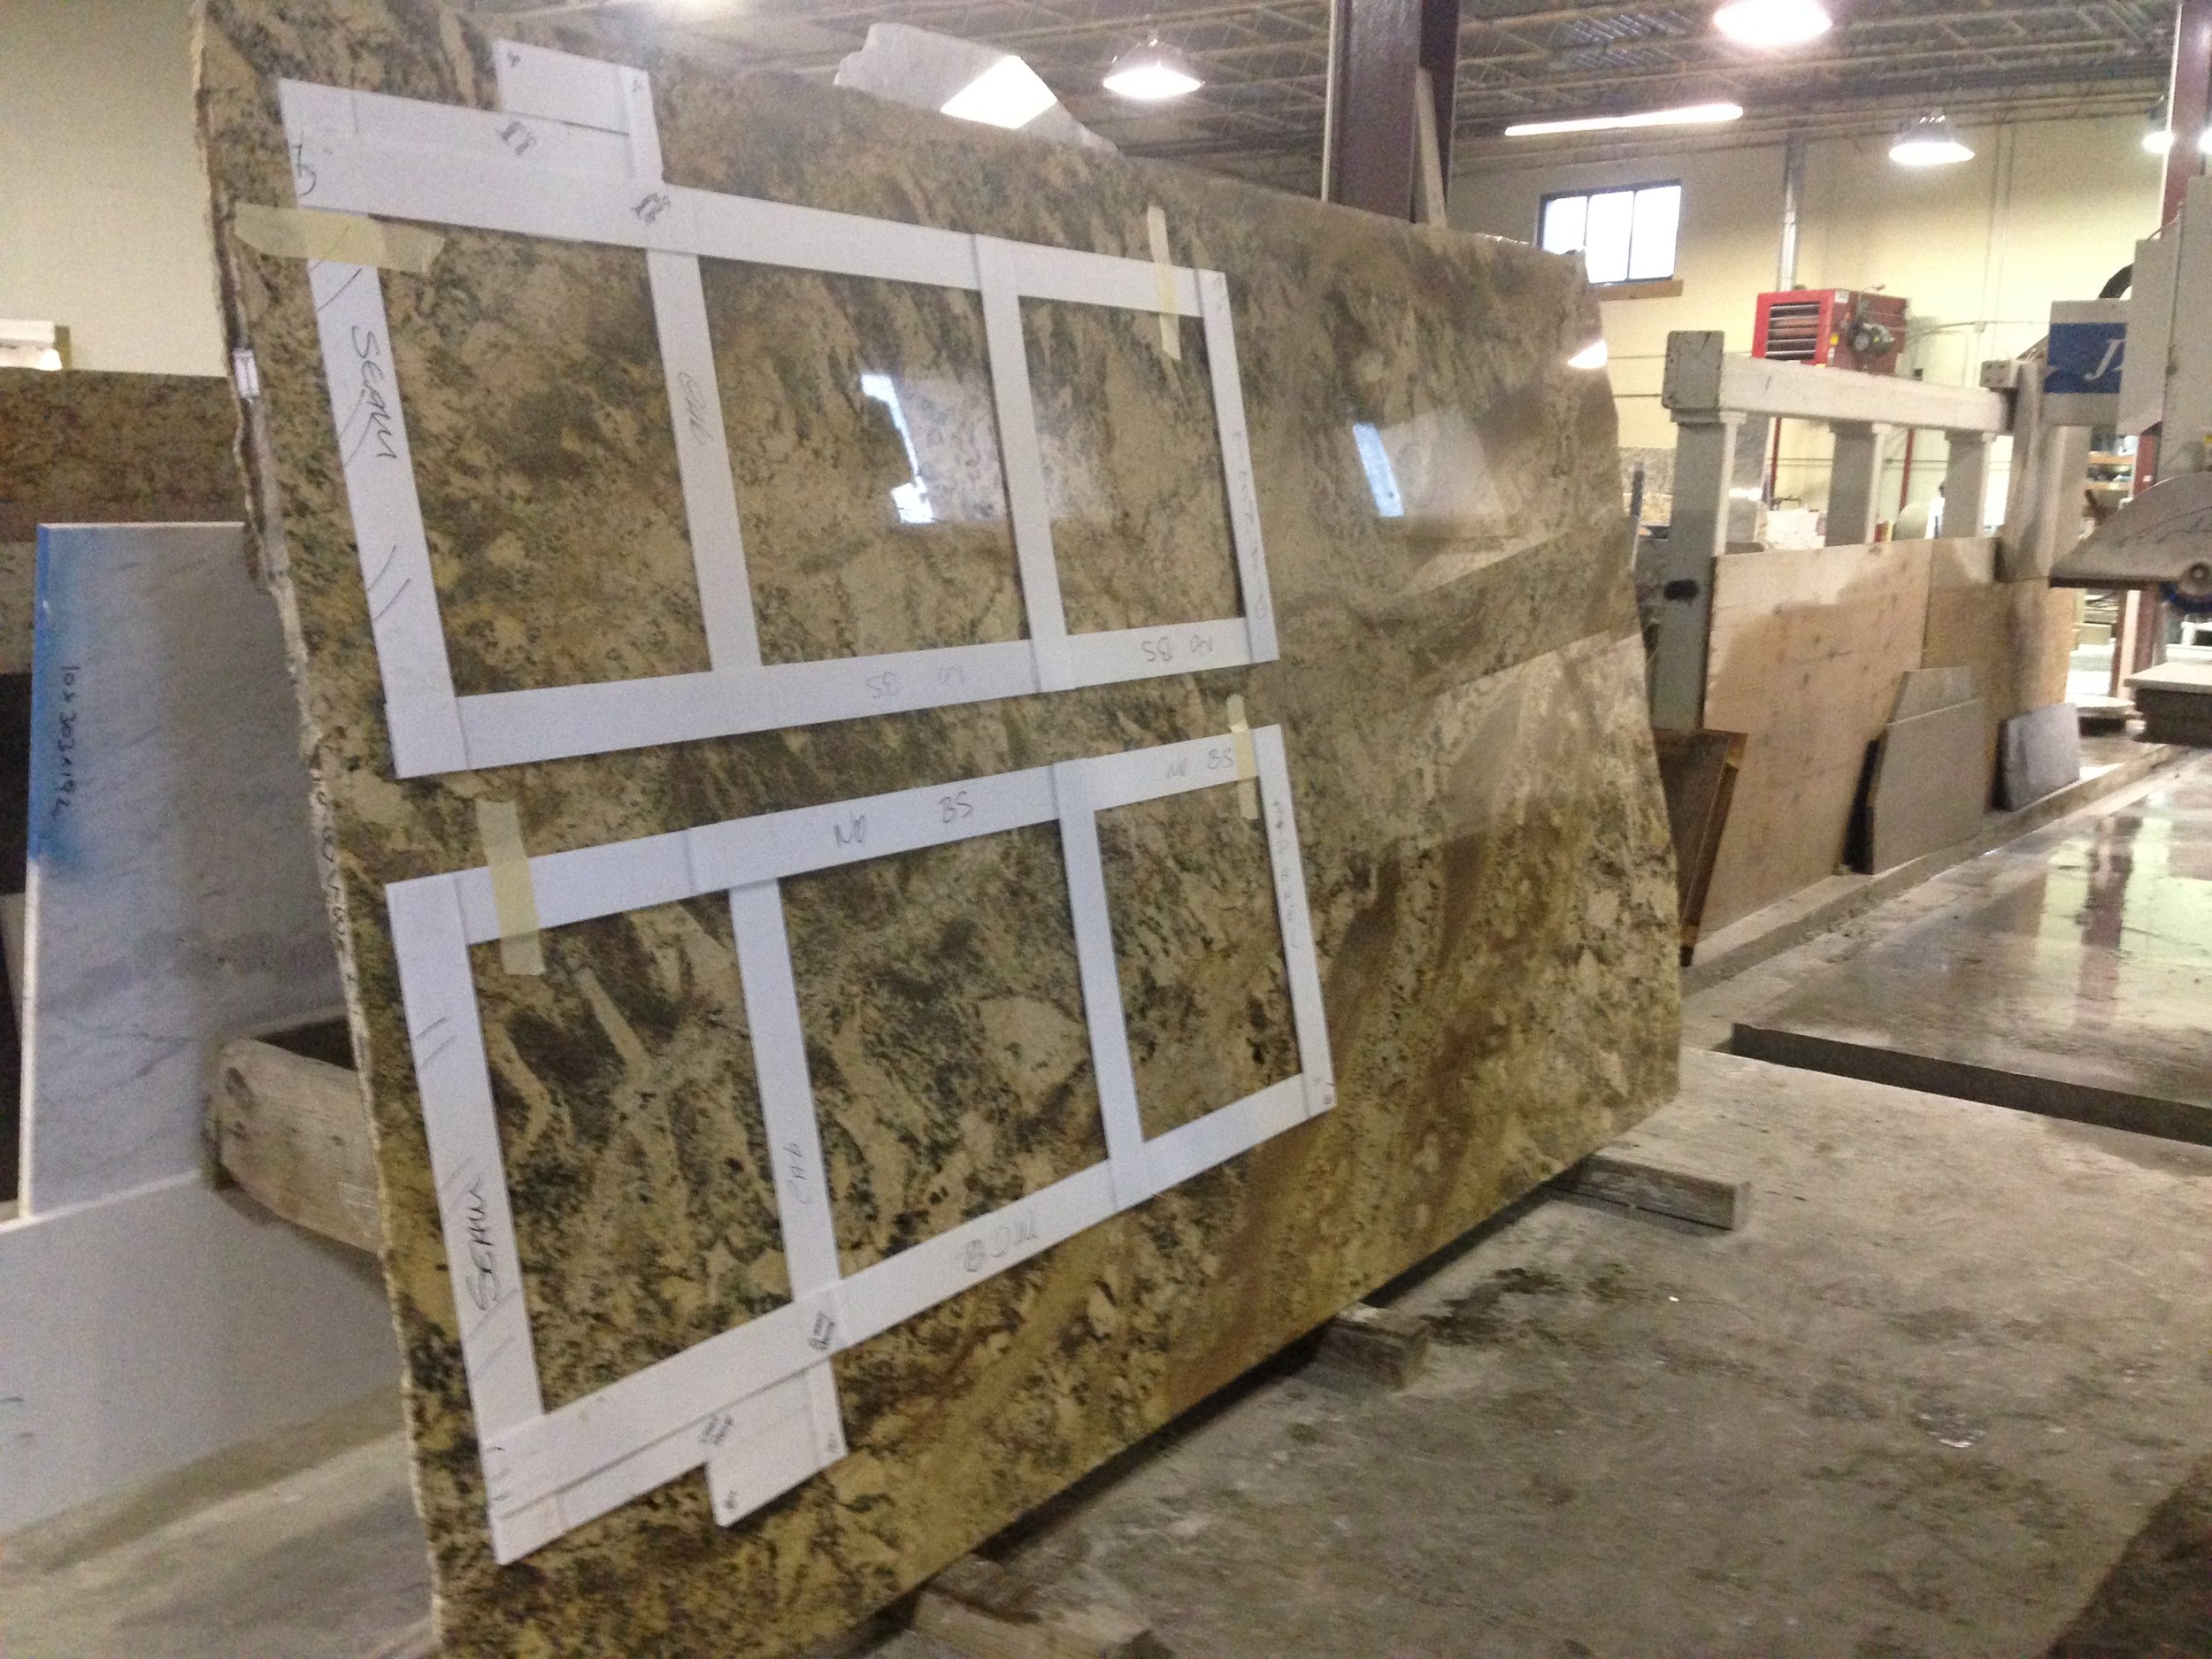
granite templating

Granite countertop installation
This stone has a lot of variation and on the template shown above, these two sections were to meet at a seam on the center of the sink. The templates were laid out so that where the seams met, they would not have an obvious contrast. In addition, we were able to locate the sink cutout on an area that didn't have a part of the pattern we wanted to highlight. The installed pieces, shown below, look just beautiful!
Enjoy the beauty of natural stone, nature's artwork,
in your home every day!

custom throw pillows with trim
Trade Secrets: The Power of Throw Pillows
Throw pillows can add so much to a room. Of course, too much of a good thing is still too much, so use them wisely and keep in mind the look you are after. More minimalist looks might benefit from a sofa with only two throw pillows, while a more transitional or traditional décor approach might use up to five or more of varying sizes and shapes depending on the size of the piece. While arguments still persist in almost every household as to whether throw pillows are an asset or a nuisance, here are six good reasons to include them.
Throw pillows ...
1. add color and pattern to an otherwise boring sofa
You only buy a sofa once in a great while so, generally speaking, it is wise to choose a neutral or at least a livable color and a classic design so you won’t tire of it. That said, throw pillows are an opportunity to add style and color that will elevate the design and break up a large expanse of sameness. Just please don’t call it a “pop” of color … let’s reserve that as a verb more appropriate for balloons and bubblegum shall we?
2. add comfort to a deep sofa
So YOU might be 5’10” with legs that go to your armpits, but when your petite aunt Sally visits, wouldn’t it be nice if she could sit on your sofa and have her feet touch the floor? A handy throw pillow to put behind you allows you to have a nice deep sofa for lounging and curling up with a good book AND a proper and comfortable seat for entertaining an assortment of guests.
3. are essential for sofa lounging
At some point (if not regularly) SOMEONE in your house is going to want to stretch out or curl up on the sofa and lie down and they will need a comfy pillow or two for their head. Enough said.
4. are a practical way to use a gorgeous piece of fabric that is costly
You fell in love with the silk appliquéd, embroidered linen that costs more than your car payment … okay, so maybe draperies for six windows in it are out of the question, but a pair of throw pillows would only take a little bit. Bonus: cover the backs of the pillows in something inexpensive and soft so they can be turned over for use in sofa lounging (see item 3) – this uses even less of the expensive fabric AND makes them irresistible to cuddle up on!
5. are a great place to add custom details to a room
Dressmaker details like trim, pleats, braid, fringe, buttons, ties, contrast banding - all of these are easily added to pillows. These sorts of details can really customize the look of a room and on a throw pillow, they are on display in an obvious location where they can be appreciated. These couture details can help further the whole design of the room; for example, wooden buttons might help establish a casual feel where fabric covered buttons add some tailored elegance. The opportunities for creativity are endless!
6. are easily changed
Pillows don’t require an army to move, so you can change them any time you want to modify the look in your room without enlisting the help of anyone else. If you just buy or make covers for your pillows, they are even easy to store – keep the filler and change the covers seasonally or whenever the occasion or your mood calls for it. They are the ultimate décor with a purpose!
Some final advice...
Be sure you have filled your pillows with down inserts – buy them a bit larger than the pillow cover for a nice full look. Replace any of those poly-fillers with down inserts. They are totally worth the modest investment. Down pillows can be plumped in an instant and will look like new, and they are not subject to the ‘pancake’ syndrome that afflicts polyester pillows.
SO, go forth and add some well designed throw pillows to your life.
You will be glad you did!

5 Tips for fabulous tablescapes
Trade Secrets: Five Tips for Fabulous Tablescapes
Tablescapes are an exercise in visual storytelling. They are meant to be changed up occasionally so they are a great way to herald the current season, or inject some personality into your room.
Here are 5 tips to help you create fabulous tablescapes using things you probably already have somewhere in your house or yard!
1 Start with lighting
A single interesting lamp or a pair of buffet lamps (tall and skinny) on either end of the console or entry table will not only shed light in that area of the room, but provide some structure and a starting point for your tablescape.
2 Include something organic
No, we are not talking about pesticide free food here ... I mean something natural like flowers, a plant, branches, a nest, seasonal berries or greens, a bowl of fruit … a little something organic always adds life to a room or a tabletop.
3 Strive for balance rather than symmetry
While symmetry can be useful and is a great tool to create a more formal feel, for the most visual interest aim for balance. Huh? What do you mean? Rather than static pairs of things, I mean use odd numbers of like items in varying shapes or textures (candlesticks, frames, etc) and/or vary the height of similar or identical objects with decorative boxes or books. Items should relate in some way to other pieces without being mind-numbingly repetitive. The overall distribution of your selections should be visually balanced ... picture your tabletop like a seesaw - the goal is to arrange your objects so that it stays level!
4 If you are including framed photographs, mix it up
There is nothing more boring than a barren table top full of identically framed 5 x 7 portraits all standing sentinel at a 45 degree angle. Vary the heights, sizes, and orientations and even the shapes of the frames – I also prefer frames that coordinate (in style or finish), but don’t match for a far more interesting ‘collected’ feel.
5 Edit, edit edit
Too much of a good thing is still ... too much! Resist the urge to cover every square inch of space with stuff. You need to leave some blank space to give the eye a break and allow the viewer to appreciate your thoughtful arrangement.
Most importantly, have fun! Use things that have meaning and reflect your family’s personality. Keep moving things around and trying different combinations until it works!
Happy Tablescaping!

8 Tips for choosing the perfect paint color
Trade Secrets: Eight Tips for Choosing the Perfect Paint Color
1 Pick colors you like.

This seems obvious, but you would be amazed at the number of people who want to choose a color that is “in” at the moment. Just because the Pantone colors of the year are rose quartz and serenity doesn’t mean these have to be YOUR colors! It is likely you will be living with your choices for much more than a year! Look at the stuff you have that delights you and see if there is a common color theme. This picture is from a client's home office - she is totally smitten with all things blue and in this personal space, constellation blue was the perfect wall color for her.
2 Use color to visually change the perceived temperature or mood of the room.
Icy blue tones in a south facing sun-drenched room can make the space actually seem cooler. Conversely, a warm yellow, orange, or red toned hue can make a north facing or dreary space feel sunnier or cozier.
3 Pick paint last after other color selections like fabrics and rugs.
There are infinite colors of paint – if there isn’t a sample chip of a color you like, paint can be custom mixed as well – or even color matched to a physical sample of something that is the color you want. There are more limited choices of fabrics and rugs, so start there and then choose a paint to coordinate.
4 Take into account the more permanent finishes in your room.

Hardwood flooring, stained woodwork or paneling, stone, brick, tile - these all have color tones and your paint choices need to work with them. We were able to totally update this 70's harvest gold bathroom with carefully selected paint applied to the wall in wide stripes.
5 Get a large sample.
Get the largest size sample you can of the paint color under consideration. Buy one of those tester jars if possible and paint a 3’ square of the color – be sure to use an adequate number of coats or you will be seeing the color under it as well. I would also suggest painting it on a piece of wallboard or hardboard instead of the wall so that you can move it around. (See # 8)
6 Beware: Colors may look darker and more intense than expected.
Once there is a whole room full of it , that sweet candy pink may look like a bubblegum factory exploded…unless you were going for dramatic, err on the side of caution especially with clearer, more vibrant colors and dial it back a bit. Choose a color one or two rows up on the chip card. I used to suggest the option of having them half the formula when you have the paint mixed, but that doesn’t just cut the intensity, it totally changes the nuances of the color as well and can have disastrous results. That said, dramatic colors can be terrific in certain spaces and elevate the whole design - just be sure dramatic is what you were after!
7 Assess your sample with a neutral background.
Your perception of color and the undertones you see changes relative to other colors (remember the white and gold vs. blue and black dress controversy??) Put a white background under your sample to better assess the color without the current background interfering.
8 Check your sample in different lighting and locations.

Look at the paint sample IN the space to be painted and during both daytime hours, when the room is lit with natural light and night time hours when the room is lit with artificial light. Different bulbs affect colors differently and can TOTALLY change the color you see. Also, move your sample around the room - some colors can look very different in shady corners than they do on brightly lit walls. And always hold the sample against the wall in the same orientation as the surface you are going to paint…the color will absolutely look different on the vertical surface of a wall than on the angled surface of a dormer or the horizontal surface of a floor or table.
Paint is one of the easiest ways to freshen and dramatically change the feel of a room. Still not sure what to choose?
Contact JRL Interiors to set up an in-home color consultation, or learn more about our virtual paint consultation services HERE